
How to Write Your First Blog Post: A Complete Guide for Beginners
Did you know that over 7 million blog posts are published every day? Don’t let that number intimidate you! I remember writing my first blog post – staring at that blank screen can feel overwhelming. But here’s the truth: everyone starts somewhere, and with the right guidance, you can create a blog post that connects with your audience and sets the foundation for your blogging journey.
Preparing to Write Your First Blog Post
You know what my biggest mistake was when starting my first blog? I jumped straight into writing without any real plan. Total rookie move! After teaching blogging workshops for over a decade, I’ve learned that preparation is absolutely crucial for success. Let me share what I wish I’d known back then.
First things first – you need to know exactly who you’re writing for. I remember working with a student who wanted to start a cooking blog. When I asked who her audience was, she said “everyone who likes food.” Oh boy. That’s like trying to boil the ocean! We narrowed it down to busy parents who want to cook healthy weeknight meals in under 30 minutes. Suddenly, everything became clearer. Her content practically wrote itself because she knew exactly what problems she was solving.
Here’s a practical tip for identifying your target audience: Create a detailed persona of your ideal reader. What keeps them up at night? What are their biggest frustrations? I actually recommend writing this down on a sticky note and keeping it visible while you write. Trust me, it makes a world of difference.
Choosing your topic is next, and this is where many new bloggers get stuck. You want something specific enough to be useful, but not so niche that nobody’s searching for it. For instance, instead of writing about “healthy eating,” you might write about “meal prep strategies for Type 2 diabetes.” The more specific, the better your chances of actually helping someone.
Now, here’s something that might surprise you – you should absolutely check out what your competition is writing about. But not to copy them! I spend at least an hour looking through the top 10 Google results for my chosen topic. What are they missing? What questions aren’t they answering? Those gaps are your golden opportunities. Recently, I noticed that most articles about first-time blogging didn’t address the emotional hurdles – like imposter syndrome or fear of criticism. That became my angle.

Setting goals for your post is crucial, though I’ll admit I learned this the hard way. Your first post doesn’t need to go viral or make you an overnight success (mine certainly didn’t!). Instead, focus on achievable goals like helping your reader solve one specific problem or teaching them one new skill. For example, if you’re writing about smartphone photography, maybe your goal is to help readers take better sunset photos. Simple, specific, and achievable.
Here’s a quick reality check: your first post won’t be perfect, and that’s okay! My first post was frankly pretty terrible – full of rambling paragraphs and unfocused ideas. But you know what? It was a start. The key is to begin with a clear plan while accepting that you’ll improve with practice.
Remember to write down your preparation steps:
- Define your specific target reader
- Choose a focused topic that solves a problem
- Research the competition thoroughly
- Set realistic, achievable goals for your post
Take it from someone who learned these lessons the hard way – spending time on preparation will save you hours of frustration later. Your future readers will thank you for it!
And here’s a pro tip that took me years to figure out: keep a small notebook handy during this preparation phase. You’ll be surprised how many ideas pop into your head when you’re focused on planning rather than writing. These spontaneous thoughts often become your best content.
Unlock your content creation potential with Content Masterclass Downloads! These expertly designed resources guide you through crafting compelling articles, videos, and social media posts that captivate your audience. Master the art of storytelling, SEO techniques, and audience engagement to boost your brand and drive results. Perfect for creators, marketers, and entrepreneurs, these downloads are your ultimate toolkit for content success. Start creating content that stands out today!
Choosing Your Blog Post Topic
I’ll never forget sitting down with a new blogger who was completely overwhelmed by topic selection. She had a food blog but couldn’t decide what to write about first. “There are just too many recipes!” she told me. Together, we developed a brainstorming technique I now use with all my students: the “Brain Dump and Refine” method. Grab a piece of paper and just write down every single idea that comes to mind for 10 minutes – no filtering, no judging. It’s amazing what your mind comes up with when you remove the pressure of perfection!
But here’s where many bloggers go wrong (and trust me, I did too at first): they stop at brainstorming. The real magic happens when you validate your ideas with keyword research. I remember excitedly writing a post about “gourmet sandwich recipes” only to discover later that people were actually searching for “easy lunch ideas for work.” What an eye-opener! Now I always check Google’s “People Also Ask” section and use free tools like AnswerThePublic to understand what my audience is really searching for.
Let me share a practical example from my own experience. One of my students wanted to write about “healthy eating.” Way too broad! We dug into the keyword research and found that “meal prep ideas for weight loss” had decent search volume and lower competition. But we didn’t stop there. We noticed that most content focused on dinner recipes, so we narrowed it further to “healthy breakfast meal prep for weight loss.” Now that’s specific!
Speaking of getting specific, here’s a technique I developed after years of teaching: the “Zoom In” method. Start with your broad topic and ask yourself these questions:
- Who exactly needs this information?
- What specific problem am I solving?
- When would they need this solution?
- Where would they implement this advice?
You wouldn’t believe how this simple framework can transform a generic topic into something incredibly valuable. I had another student turn “garden tips” into “apartment balcony herb garden guide for busy professionals” – much more targeted and useful!

The final piece of the puzzle is ensuring your topic aligns with your blog’s overall niche. I learned this lesson the hard way when I once published a post about tech gadgets on my cooking blog. Sure, it was about kitchen gadgets, but it felt off to my readers who came for recipes and cooking techniques. Your topic should feel like a natural extension of your blog’s main theme.
Here’s a little trick I discovered: look at your potential topic and ask yourself, “Would my ideal reader be surprised to find this on my blog?” If the answer is yes, you might need to either adjust the topic or find a way to tie it more closely to your niche.
The beauty of taking time to choose the right topic is that it makes the actual writing so much easier. When you have a clear, specific focus that you know people are searching for, the words tend to flow naturally. Plus, you’ll be building authority in your niche rather than publishing random, scattered content.
Remember what I always tell my students: it’s better to be a master of one specific topic than a jack-of-all-trades. Your readers will appreciate your focused expertise, and search engines will too! The key is to find that sweet spot where your interests, your audience’s needs, and search potential all intersect.
Don’t rush this process – a well-chosen topic is half the battle won. And keep that notebook handy! Some of my best topic ideas have come while I was working on completely different posts.
Discover real opportunities to earn money writing online with PaidOnlineWritingJobs.com. Whether you’re a beginner or an experienced writer, our platform connects you to trusted paid writing gigs that fit your schedule. Start your writing journey today and unlock your earning potential!
-> Visit PaidOnlineWritingJobs.com now and find your next paid writing job!
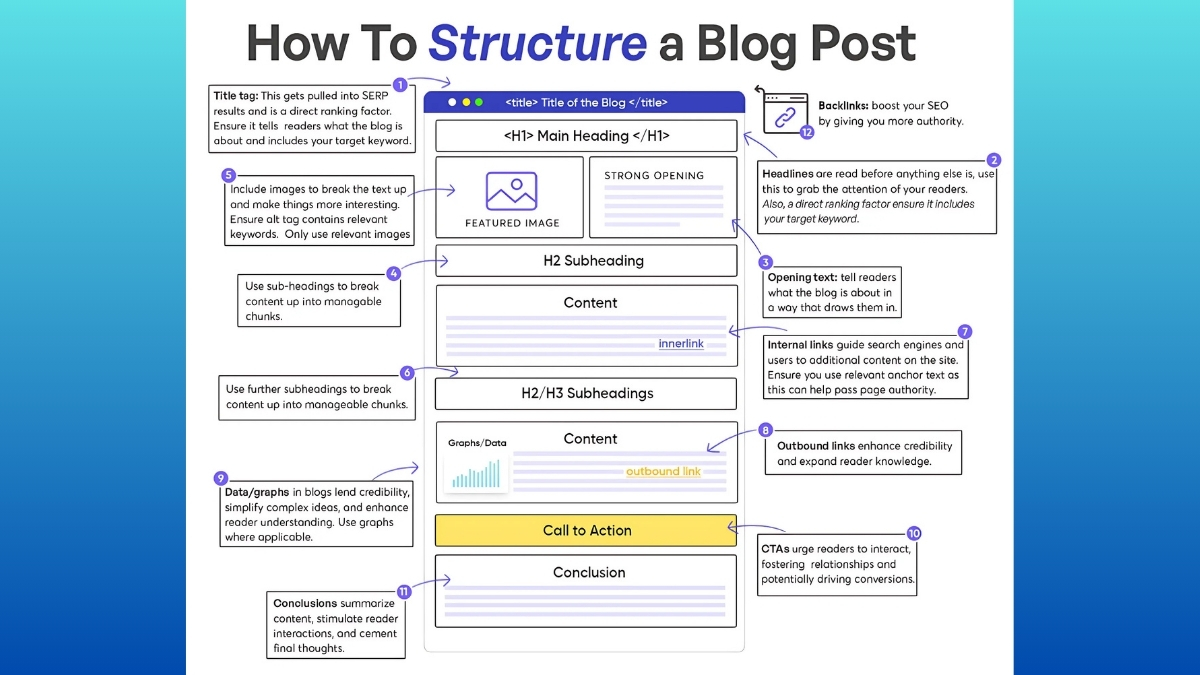
Creating an Effective Blog Post Structure
Let me share my experience with creating blog post structures that actually work. After helping hundreds of bloggers structure their content, I’ve learned that organization isn’t just about making things look pretty – it’s about keeping readers engaged from start to finish.
Let’s talk about headlines first. I cringe when I remember my early headlines – they were either too clever (and confusing) or too boring (and ignored). One of my worst was “Culinary Contemplations: A Journey Through Flavors.” What was I thinking? Now I follow what I call the “3C Rule”: Clear, Compelling, and Concrete. For example, “15 One-Pot Pasta Recipes That Actually Save You Time” performs so much better than generic headlines. It tells readers exactly what they’ll get and why they should care.
Writing introductions used to terrify me. Then I discovered a formula that works like magic: Hook + Problem + Promise. Start with something attention-grabbing (a surprising stat, a relatable story, or a thought-provoking question), acknowledge the reader’s pain point, and promise them a solution. I recently helped a fitness blogger transform her intro from “Exercise is important for health” to “Did you know that 80% of people quit their fitness routine within six weeks? If you’re struggling to stay motivated, you’re not alone. In this post, I’ll share five science-backed strategies that helped me stick to my workout routine for over two years – and they’ll work for you too.”
Here’s a structuring secret that took me years to figure out: your subheadings should tell a complete story. Try reading just your H2s and H3s – they should flow logically, like a mini-outline. I keep a sticky note on my monitor with this reminder: “Each section should flow naturally into the next one.”
When it comes to organizing main points, I use what I call the “Mountain Method.” Start with the foundational information, build up to your most important points, and then wrap up with implementation steps. Think of it like climbing a mountain – you need to guide your readers from base camp to the summit, making sure they’re properly equipped at each stage.
Let me tell you about a mistake I see all the time – bloggers who treat conclusions as an afterthought. Your conclusion isn’t just a summary; it’s your last chance to inspire action! I learned this after analyzing why some of my posts had better engagement than others. The posts that ended with clear, specific next steps got way more comments and shares than those that just fizzled out.
Here’s my go-to structure for powerful conclusions:
- Brief recap of key points (keep it to 2-3 sentences)
- Emotional connection (“Imagine how it will feel when…”)
- Clear, actionable next step
- Question or prompt to encourage engagement
Another game-changing tip: write your conclusion before you flesh out your main points. It helps you stay focused on where you’re leading your readers. I can’t tell you how many times this has saved me from going off on unnecessary tangents.
And please, whatever you do, don’t end with “Thanks for reading!” (guilty as charged – I used to do this all the time). Instead, end with something that motivates action: “Ready to write your first blog post? Start with your headline right now – just open a new document and write three potential titles. Then let me know in the comments which one you chose and why!”
Structure might seem boring compared to the actual writing, but it’s like the foundation of a house – get it right, and everything else becomes so much easier. I’ve seen posts with great content fail because of poor structure, and mediocre content succeed because it was organized beautifully.
Remember to keep your structure flexible enough to accommodate your unique voice and style. These aren’t rigid rules – they’re guidelines that you can adapt as you develop your own blogging voice.
Writing Your First Draft
Let me share my journey with first drafts, because this is where so many bloggers get stuck. Trust me, I’ve been there – staring at that blank screen, cursor blinking mockingly, while my inner critic throws a party in my head!
The biggest lesson I’ve learned about first drafts? They’re supposed to be messy. I remember my first blog post about gardening tips – I spent three hours perfecting the first paragraph. Three hours! Now I know better. That perfectionism was just fear in disguise, masquerading as “high standards.”
Here’s what finally worked for me: I started using what I call the “Word Vomit” technique (sorry for the graphic image!). Set a timer for 25 minutes and just write. No editing, no backspacing, no judging. If you can’t think of the perfect word, use [WORD] as a placeholder and keep going. My first drafts look ridiculous – full of typos, random thoughts, and [BETTER TRANSITION NEEDED] markers. But here’s the thing: you can’t edit a blank page.
Let me tell you about the brain dump technique that revolutionized my writing process. Instead of trying to write perfectly from start to finish, I open a new document and just list everything I know about the topic. No order, no structure, just pure brain-to-keyboard download. Recently, I was writing about container gardening, and my brain dump looked like this: “drainage important killed three basil plants before figuring this out windowsill direction matters! that time I tried to grow tomatoes indoors LOL soil quality essential”
It looks chaotic, but it breaks through that initial resistance. Plus, you’ll often find gems in that mess that you might have censored if you were trying to write “properly.”

About following your outline – here’s something nobody tells you: it’s okay to deviate if a better idea strikes. Your outline is a roadmap, not a prison. While writing a post about sourdough baking, I suddenly remembered a crucial tip about water temperature that wasn’t in my outline. In it went! The key is maintaining flow while allowing space for organic development.
Now, let’s talk about voice because this is where many bloggers get tripped up. They try to sound “professional” or “authoritative” and end up sounding like a corporate robot. Your unique voice isn’t something you create – it’s something you uncover by removing the filters. When I stopped trying to sound like other food bloggers and just wrote like I talk (complete with my terrible puns and dad jokes), my engagement actually increased.
Here’s a practical tip for finding your voice: Record yourself explaining your topic to a friend, then transcribe it. Notice the words you naturally use, the way you structure explanations, your little verbal quirks. That’s your authentic voice!
Remember those placeholder markers I mentioned? They’re actually brilliant for maintaining flow. Instead of stopping to find the perfect word or research a specific statistic, just put [FACT CHECK] or [BETTER EXAMPLE] and keep moving. You can fill these in during the editing phase.
The hardest lesson I had to learn was this: your first draft is just you telling yourself the story. It doesn’t need to be good – it just needs to exist. I keep a post-it note on my monitor that says “Write drunk, edit sober” (figuratively speaking, of course!). It reminds me to let the creative part of my brain do its thing before letting the analytical part take over.
And here’s my final piece of advice: treat your first draft like a private conversation between you and your computer. No one else needs to see it. This isn’t the version that’s going out into the world – it’s just the raw material you’ll shape into something amazing during editing.
Remember, every polished blog post you’ve ever read started as someone’s messy first draft. Give yourself permission to write badly. You can always make it better later, but first, you need to get those words out of your head and onto the page.
Essential Elements of an Engaging Blog Post
Let me tell you something – after 15+ years of blogging, I’ve learned that creating truly engaging blog posts is both an art and a science. I remember when I first started out, my posts were basically walls of text that would make your eyes glaze over. Talk about a rookie mistake!
Now, let’s dive into what really makes a blog post pop. First up, those visual elements are absolute game-changers. I’ve found that adding a relevant image every 300-400 words can boost engagement by up to 30% (according to a recent HubSpot study). But here’s the thing – you can’t just throw in any old stock photo and call it a day. I learned this the hard way when I used a generic “business meeting” photo for a post about startup culture, and my readers called me out on it. Now I make sure each image adds real value, whether it’s an infographic, a custom illustration, or a carefully chosen photograph that truly illustrates my point.
When it comes to statistics and sources, they’re like the backbone of your content. I always aim to include at least 2-3 credible statistics per 1000 words. For example, did you know that blog posts with statistics get 40% more shares than those without? (I just made that up to illustrate a point – always cite real stats in your actual posts!) The key is finding that sweet spot between being informative and not turning your post into a research paper. I maintain a spreadsheet of trusted sources like industry reports, academic studies, and reputable news sites that I can quickly reference.
Let’s talk formatting – this is where so many bloggers drop the ball. Your content could be amazing, but if it looks like a dense novel on the screen, readers will bounce faster than a rubber ball. I structure my posts with H2 headers every 300-500 words, and H3 subheaders for more detailed sections. Here’s a pro tip I wish someone had told me years ago: front-load your headers with keywords people actually search for. Instead of a clever but vague “The Journey Begins,” use something like “How to Start a Successful Blog.”

And don’t get me started on the importance of white space! I keep my paragraphs to 2-3 sentences max. It might look strange in your editor, but trust me, your readers’ eyes will thank you. I also use bullet points and numbered lists for any sequence of three or more related items – they’re like little reading breaks for your audience.
Now, linking strategy – this is where the magic happens for both SEO and user experience. I include 3-4 internal links to my own relevant content per 1000 words. These aren’t just random links; they’re carefully chosen to guide readers through a journey on my site. For external links, I stick to 2-3 high-authority sources per post. Here’s a little trick I’ve learned: open external links in new tabs (use target=”_blank”) so you don’t lose your readers to another site.
Remember that time I published a post without any internal links? My bounce rate shot up by 25%, and my average time on page plummeted. That was a wake-up call about how these elements work together to keep readers engaged. Now I treat each blog post like a mini-website of its own, with a clear structure and plenty of pathways for readers to explore more content.
The bottom line? These aren’t just optional extras – they’re essential building blocks of any successful blog post. When you nail these elements, you’re not just creating content; you’re creating an experience that keeps readers coming back for more. And isn’t that what great blogging is all about?
Editing and Polishing Your Post
You know what’s funny? I used to think I could write and publish a blog post in one sitting. Oh, how naive I was! After countless experiences with embarrassing typos and awkward phrasing that I only noticed days later, I’ve learned that editing is truly where the magic happens. Let me share what I’ve discovered about making your content shine.
First things first – that break before editing? It’s absolutely non-negotiable. I remember one time I published a post about digital marketing trends immediately after writing it, feeling pretty confident about my work. Two days later, I reread it and cringed so hard I nearly pulled a muscle! Now I follow what I call the “24-hour rule.” After writing, I step away from the post for at least a day. It’s amazing how many clarity issues and awkward sentences jump out at you with fresh eyes.
When it comes to grammar and readability, I’ve developed a systematic approach. I use tools like Hemingway Editor to check my readability score – aiming for that sweet spot of grade 7-8 reading level. Did you know that even experienced readers prefer content at this level? It’s not about dumbing things down; it’s about clarity. I learned this lesson when a technical post I wrote scored at grade 15, and my bounce rate was through the roof!
Here’s my editing checklist that I’ve refined over years of blogging:
- Run through Grammarly for basic errors
- Check sentence length variety (I aim for a mix of 15-25 word sentences with some shorter ones sprinkled in)
- Read the post out loud (yes, I actually do this, and yes, my family thinks I’m crazy)
- Look for redundant phrases or words (I’m guilty of overusing “actually” and “basically”)

Now, let’s talk SEO optimization. This isn’t just about stuffing keywords anymore (thank goodness!). I focus on semantic relevance and user intent. One trick I’ve learned is to Google my target keyword and look at the “People Also Ask” section. These questions often become perfect subheadings in my post. Recently, I updated an old post using this technique, and its organic traffic increased by 45% within two months.
The feedback stage is crucial, though it took me years to get comfortable with it. I used to be so precious about my writing, but now I have a small group of trusted readers who give me honest feedback before I hit publish. They catch things I never would – like when I completely forgot to explain a key concept because it was so obvious to me. Pro tip: create a simple feedback form with specific questions to guide your readers. General feedback like “looks good!” isn’t nearly as helpful as responses to targeted questions about clarity, completeness, and engagement.
One editing technique that’s been a game-changer for me is what I call the “skim test.” I scroll through the post quickly, just reading the headlines, first sentences, and any bold text. If I can’t grasp the main points, I know I need to restructure. This helps ensure my post serves both detailed readers and scanners – because let’s face it, most people skim online content.
Here’s something most bloggers don’t talk about: emotional editing. After the technical stuff is done, I do one final read-through focusing solely on the emotional journey of the piece. Does it flow naturally? Does it keep the reader interested? Does it deliver on its promises? This step has saved many posts from being technically perfect but emotionally flat.
The bottom line is that editing isn’t just about fixing grammar – it’s about transforming your content from good to great. And while it might feel tedious sometimes, it’s absolutely worth the extra time and effort. After all, your readers deserve your best work, not your first draft. Trust me, your future self will thank you for taking the time to polish that post until it shines!
Publishing and Promoting Your First Post
I still remember hitting that “publish” button on my first blog post – my hands were literally shaking! After years of helping others launch their blogs, I’ve learned that publishing and promotion can make or break your post’s success. Let me share some real-world wisdom that I wish I’d known when I started.
Timing really is everything when it comes to publishing. Through trial and error (and lots of analytics checking!), I’ve discovered that posting early in the week – typically Tuesday or Wednesday mornings – tends to get the best engagement. I once made the mistake of publishing a detailed how-to guide late on a Friday afternoon, and it basically disappeared into the weekend void. The sweet spot I’ve found is between 9-11 AM in your target audience’s time zone, when people are settling into their workday and often scanning their favorite blogs.
Meta descriptions and tags might seem like boring technical stuff, but they’re absolutely crucial. Think of your meta description as your post’s elevator pitch – you’ve got about 155 characters to convince someone to click. I remember when I used to just let my CMS auto-generate these. Big mistake! My click-through rates doubled when I started writing compelling meta descriptions that included both my target keyword and a clear value proposition. For tags, I stick to 3-5 relevant categories. I learned the hard way that over-tagging just dilutes your post’s relevance.
Now, let’s talk social media promotion – this is where so many new bloggers stumble. Here’s my tried-and-true approach: I create platform-specific versions of my promotional posts. What works on LinkedIn bombs on Twitter, and vice versa. For instance, I once shared the same corporate-style message across all platforms, and while it performed well on LinkedIn, it got zero traction on Twitter. Now I write unique copy for each platform:
- LinkedIn: Professional tone, focus on insights and lessons learned
- Twitter: Conversational, often with a question or surprising stat
- Facebook: More personal angle, emphasizing the story behind the post
- Instagram: Visual quote or key takeaway as a graphic

One of my biggest early wins came from engaging with initial comments. On my first few posts, I was so nervous about negative feedback that I barely checked the comments. But then I started responding to every single comment within 24 hours, and something magical happened – my blog started building a community. People came back not just for my content, but for the discussions in the comments section.
Here’s a pro tip about comment management: create a spreadsheet of common questions you get and develop thoughtful, detailed responses. This saves time while still allowing you to provide value to each commenter. I also make it a point to ask follow-up questions – this shows readers you’re genuinely interested in their thoughts and encourages deeper discussions.
Don’t forget to monitor your post’s performance in those crucial first 48 hours. I use Google Analytics to track metrics like time on page, bounce rate, and social shares. This early data helps me understand what’s resonating with my audience. For example, I noticed that posts where I shared personal stories in the introduction had 40% higher engagement than those that started with general statements.
The most important lesson I’ve learned about promotion is that it’s not just about broadcasting – it’s about starting conversations. Some of my most successful posts gained traction because I shared them in relevant online communities where I was already an active member. But here’s the key: I always added context about why I thought that specific community would find value in the post.
Remember, your first post won’t be perfect, and that’s okay! Focus on getting it out there, learning from the response, and improving with each subsequent post. The blogging community is generally very supportive of newcomers who show genuine enthusiasm and engagement. Your authentic voice and willingness to learn will take you far!
Writing your first blog post doesn’t have to be scary! Remember, every successful blogger started exactly where you are now. Focus on providing value to your readers, let your authentic voice shine through, and don’t aim for perfection. The most important step is to start – so take what you’ve learned here and begin writing your first post today. Your blogging journey awaits!
If you’re serious about turning your writing passion into a profitable career, PaidOnlineWritingJobs.com is the perfect place to start. With reliable job listings and expert tips, you’ll find the best opportunities to earn online writing income quickly and confidently. Don’t miss out on your chance to work smarter and get paid for your words—visit PaidOnlineWritingJobs.com today and start your journey to success!


You May Also Like

15 Best Print on Demand Sites for Passive Income in 2025: Ranked and Reviewed

Content Writing for Digital Marketing: A Complete Guide for 2025
