


Here’s something I wish someone had told me when I started: the hardest part of making money online isn’t finding ideas. It’s choosing one and sticking with it long enough to see results. I used to bounce between blogging, selling printables, freelancing, and affiliate links, convinced that the next idea would be “the one.” Instead I spent months with five half-built projects and no income.
What finally changed things was a simple structure: pick one path, build it in small steps, and give it 90 days. Not 90 days of perfection. Just 90 days of showing up, learning, and adjusting while the kids nap, nap, or (in my house) refuse to nap.
The timing is good for a fresh start. Recent data shows side hustles are less common than they were a few years ago, but people who do them are earning more and treating them more seriously. Meanwhile, businesses are hiring for AI-enabled skills, brands are paying for real-person content, and scams are rising, so a careful, honest plan matters more than ever.
In this guide, I’ll give you a 90-day plan to start making money online as a stay-at-home mom, with weekly steps, a simple way to choose your path, and the checkpoints that keep you on track. (No one can guarantee income, and results vary widely. This plan is about building a real foundation.)
Before You Begin: Set Realistic Expectations
A few honest truths from the latest research on side hustles:
- The typical income is modest at first. One major survey found an average side hustle income far above the median, because a small group earns much more. Aim for your first $100, then your first $500, before dreaming bigger.
- Time matters. In one analysis, people earning $500 or more per month typically spent at least five hours a week on their work.
- Burnout is real. A large share of side hustlers report burnout, so protect your rest.
- Scams target moms. Never pay to get a job, and verify every opportunity.
- Taxes apply from the first dollar. In the U.S., net self-employment earnings of $400 or more trigger self-employment tax.
You’ll also need a tracker. A simple spreadsheet with these columns works well: week, hours worked, tasks completed, money earned, money spent, energy level (1 to 10).

Phase 1: Clarity (Weeks 1-2)
Goal: Choose one path and set your boundaries.
Week 1: Know your time, skills, and goals
- Track your time for a week to find your real work windows (nap time, school hours, early morning).
- Set a weekly hour limit, such as 5 to 10 hours, and a minimum viable week for chaotic times.
- List your skills and experience: organization, writing, teaching, design, customer service, cooking, budgeting, and so on.
- Write your goal: how much you’d like to earn each month, and why.
- Talk to your partner or support person about protected work time.
Week 2: Choose your path
Compare these beginner-friendly options:
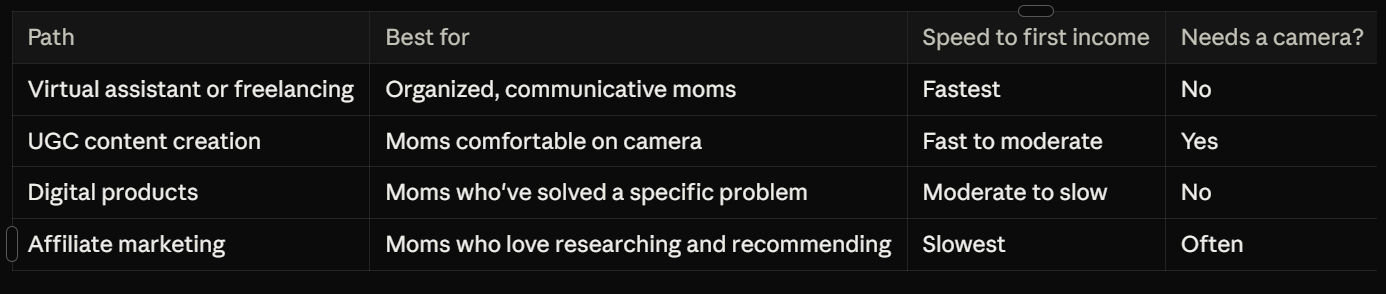
Answer these four questions:
- Which skill do I already have?
- How quickly do I need income?
- Am I comfortable showing my face?
- Which task would I enjoy doing weekly for three months?
Pick one path for the next 90 days. You can add another later.
Checkpoint: You’ve chosen one path, one weekly hour limit, and one reason you’re doing this.
Phase 2: Foundation (Weeks 3-5)
Goal: Build the basics so you can start safely.
Week 3: Learn the core skill
- Spend your hours learning the basics of your chosen path through free tutorials, library resources, or low-cost courses. Avoid expensive programs that promise guaranteed results.
- Practice on your own tasks first: organize your own inbox, film a practice product video, outline a planner, or write a sample product review.
- Use an AI assistant to brainstorm and draft, then review and edit everything yourself.
Week 4: Create proof
You don’t need clients to build a portfolio. Make three to five samples:
- VA or freelancing: a mock content calendar, a sample inbox system, a services menu
- UGC: sample videos for products you own
- Digital products: a first version of a planner, checklist, or mini-guide
- Affiliate marketing: three honest reviews of products you actually use
Label samples honestly as samples.
Week 5: Set up your business basics
- Open a separate bank account for your online income.
- Create a simple income and expense tracker.
- Write a one-page agreement or terms that covers scope, payment, deadlines, and ownership (have a professional review it if you can).
- Set up a tax savings plan. Many tax professionals suggest setting aside roughly 25% to 30% of earnings, but check with a tax preparer for your situation.
- Review your safety: strong passwords, two-factor authentication, and the warning signs of work-from-home scams.
- Create a simple profile or one-page website with your photo, your focus, and how to contact you.
Checkpoint: You have samples, a profile, a tracker, a separate account, and a tax plan.

Phase 3: First Income (Weeks 6-9)
Goal: Make your first sale, client, or commission.
Week 6: Make your offer clear
Write one sentence:
“I help [specific person] [achieve specific result] by [your service, product, or content].”
Then define what you’re offering, what’s included, how long it takes, and your starting price. Choose a fair price: not so low that you’d resent the work.
Week 7: Start reaching people
Choose one or two methods:
- Warm outreach: message 10 people you know who might need your service or know someone who does.
- Direct pitches: send 10 personalized pitches to small businesses or brands that fit your niche.
- Marketplaces: create a profile and apply to a few well-matched opportunities on established platforms.
- Content: share three helpful posts or short videos about your niche, and invite people to follow or subscribe.
- Email signup: offer a simple free resource so people can join your list.
Aim for steady outreach, not mass spam. Personal, specific messages work better.
Week 8: Follow up and take your first yes
- Follow up politely with everyone who didn’t reply.
- Consider a small trial project or starter offer to earn your first testimonial. Don’t give away your time for free indefinitely.
- Deliver your first project with care. Over-communicate, meet deadlines, and ask questions.
- Document your process so the next time is faster.
Week 9: Collect proof and learn
- Ask for a short testimonial from every happy customer.
- Review your tracker. How long did each task really take? What was your earnings per hour?
- Note what felt good and what felt draining.
- Improve your offer based on what you learned.
Checkpoint: You’ve reached out to at least 20 people, delivered or published your first work, and gathered feedback. If you’ve earned your first dollar, celebrate it!

Phase 4: Systemize and Grow (Weeks 10-13)
Goal: Make your work repeatable and sustainable.
Week 10: Create your templates and systems
- Save reusable templates for emails, proposals, checklists, and onboarding.
- Build a simple weekly routine for outreach, delivery, and admin.
- Use AI to draft routine documents faster, then review them with a human eye.
Week 11: Raise your visibility
- Update your portfolio with real results and testimonials.
- Post consistently about your niche: honest tips, behind-the-scenes, and results.
- Start building an email list, since platforms can change their rules and limit links.
- Join one community or group where your ideal customers or peers gather. Be helpful before you promote.
Week 12: Review your numbers and adjust
- Compare your income, hours, and energy levels with your goals.
- Ask: What brought the best results? What should I stop doing? What deserves more time?
- Decide whether to raise your prices, add a second offer, or deepen your first.
Week 13: Plan the next 90 days
- Set one clear goal for the next quarter.
- Choose one new habit or skill to improve.
- Decide whether you need extra childcare, tools, or help.
- Check your tax set-aside and records, and talk to a tax preparer if your income is growing.
- Review your support system and your burnout warning signs.
Checkpoint: You have a repeatable process, proof of your work, a plan for the next quarter, and a healthy routine.

A Simple Weekly Rhythm
Here’s a template you can adapt:
- Monday: Plan your priorities for the week (15 minutes).
- Tuesday and Wednesday: Deep work: learn, create, deliver.
- Thursday: Outreach and admin.
- Friday: Review your tracker, celebrate wins, and plan next week.
- Weekend: Rest and family time.
Metrics to Track
- Hours worked per week
- Number of outreach messages sent
- Replies and conversations
- Clients, sales, or commissions
- Income and expenses
- Earnings per hour
- Your energy score
Common Mistakes to Avoid
- Trying everything at once. Choose one path.
- Waiting until you feel “ready.” Start with samples.
- Underpricing.
- Skipping agreements and tax planning.
- Falling for scams that charge you to work or promise easy money.
- Publishing unchecked AI content.
- Comparing yourself to social media highlights.
- Quitting before week 13.

What If Progress Is Slow?
It’s normal. If you reach week 13 without income:
- Review your outreach. Did you contact enough people?
- Check your offer. Is it specific and aimed at a clear customer?
- Ask for feedback from people in your niche.
- Improve your samples and portfolio.
- Consider adjusting your path, not abandoning your goal.
Slow progress usually means something to adjust, not that you’ve failed.
Build Your Plan With a Complete Roadmap
This 90-day plan gives you the structure. If you’d like a deeper, beginner-friendly guide to choosing your path, getting your first clients or customers, and building a sustainable income from home, take a look at my ebook:
The Stay-At-Home Mom’s Guide To Making Money Online

Trust me, having a roadmap beside you makes the first 90 days feel a whole lot less overwhelming.
Final Thoughts
You don’t need a perfect plan, a huge budget, or hours of free time to start earning online. You need one clear path, small steady steps, honest expectations, and the courage to ask for your first yes. Protect yourself from scams, plan for taxes, take care of your energy, and give yourself 90 days. A year from now, you’ll be glad you started today.










Leave a Reply